
Hello together,
today i want to show you one of the most essential and powerful ways to fill a GUI with life. Bindings.

The first thing you should do, is to define and insert the binding in the XAML document. This can be inserted in nearly every property of an object. An simple example would be to create a listview with 2 columns where both columns are filled separately with its keywords: {Binding Name} {Binding Object}
This is how this simple list looks like in the XAML file:
        <ListView x:Name="lvVariables" Grid.Column="2" Grid.Row="0" Margin="15,70,15,15" >
            <ListView.View>
                <GridView>
                    <GridViewColumn Header="Name" Width="210" DisplayMemberBinding="{Binding Name}" />
                    <GridViewColumn Header="Objekt" Width="250" DisplayMemberBinding="{Binding Objekt}"/>
                </GridView>
            </ListView.View>
        </ListView>
Take a look at the picture – the right part of the image shows you this step – you create a storeplace in the GUI and the names of the binding values. Now an object has to be attached to this element which has the exact property names of the specified bindings.
In Powershell this had to be done by using a PSCustomObject otherwise it would not work properly. You can add the childitems easily with an loop as in the following example ( but also pipe and so on )
                    foreach ($var in $variables)
                    {
                        if ($var -and $var.Name -and $var.Value)
                        {
                            $varValue=(($var.Value.ToString()).Replace('System.Windows.','')).Replace('Controls.','')

                            $param=[PSCustomObject]@{
                                Name =    "$($var.Name)"
                                Objekt =  "$varvalue"
                            }

                            $GUI_Manager_lvVariables.Items.Add($param)
                        }
                    }
As you can see, the PSCustomObject is created with the same property names as defined before in the XAML file as binding. With this reference the objects are filled which fortunately can be a list of objects. So you can add a number of items to any object which by itself can hold more than one item. If you take a closer look at the picture again, you see that this process is shown in the left part. Both parts have to match each other.
Easy isn´t it? But where is the power? Well..
As i said before, you can attach bindings to nearly every properties in the XAML. How could this be powerful? Let´s take a look:
        <ListView Grid.Column="4" Grid.Row="0" x:Name="lvEvents" Margin="15,70,25,15" >
            <ListView.View>
                <GridView>
                    <GridView.Columns>
                        <GridViewColumn>
                            <GridViewColumnHeader Content="Name" Width="Auto" MinWidth="200px"/>
                            <GridViewColumn.CellTemplate>
                                <DataTemplate>
                                    <TextBlock Text="{Binding Path=Name}" TextAlignment="Left" Width="Auto" FontWeight="{Binding Path=Set}" />
                                </DataTemplate>
                            </GridViewColumn.CellTemplate>
                        </GridViewColumn>
                    </GridView.Columns>
                </GridView>
            </ListView.View>
        </ListView>
Here i created a listview with a defined column and its CellTemplate which stores a TextBlock in it. The Textblocks have two bindings – the first one is attached to the property Text as Name and the second one to the property FontWeight as Set .
Now you can create in Powershell a PSCustomObject with also the properties Name and Set and fill these by your own logic where you insert in the “Set-part” the values “Normal” or “Bold” – for example like this:
                    foreach ($Event in $Events)
                    {
                        $FunctionNameForEvent = "$" + $GUI_Manager_lvVariables.SelectedValue.Name + '.Add_' + $Event
                        $matches = [regex]::Matches(($GUI_Manager_tbCode.Text).ToLower(),'(\{0})' -f $FunctionNameForEvent.ToLower())

                        $set = "normal"
                        if ($Matches.Count -gt 0){
                            $set="bold"
                        }

                        $param=[PSCustomObject]@{
                            Set=$set
                            Name = "$Event"
                        }

                        $GUI_Manager_lvEvents.Items.Add($param)
                    }
And this is what it would look like:
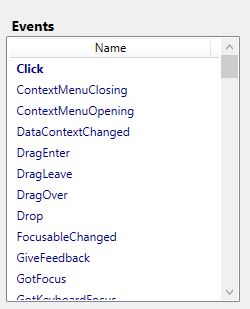
Do you feel the power now a little more? Just imagine what you can do!
Just one more example:
You could attach a folder with images and running in Powershell in the codeBehind file through these and bind its Name, Reference and ImageLink to it – dynamically! Afterwards you just attach the PSCustomObject and Voilá! A list of images – ready to present to your customer
And this is just the first touch of how bindings can be used. Further on i will show more complex bindings. They can be attached to styles – to itself and events and even more. Interested? Then keep an eye on my blog.
I hope you enjoyed this post. Tell me if you liked it and what else you want to know / to see.
Greetings
David
